Creation and Generation
Now that we are set up to use the RASP-Platform, let's dive right in and generate code for our first application.
Creation of JSON blueprint
Let us create an application which handles CRUD operations for a single class - say playground. During our design phase, we arrive at the following UML Class diagram :
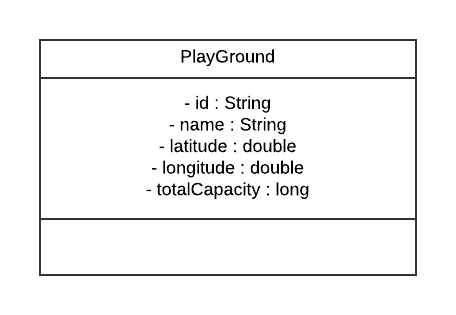
This Diagram can be directly translated to a JSON specification as follows :
{
	"playground": {
		"cluster": "DB_PROFILE",
		"ui": false,
		"api": true,
		"display_name": "PlayGround",
		"fields": {
			"id": {
				"index": true,
				"name": "id",
				"length": 100,
				"required": true,
				"type": "String"
			},
			"name": {
				"index": true,
				"name": "name",
				"length": 128,
				"required" : true,
				"type": "String"
			},
			"latitude": {
				"name": "latitude",
				"type": "double"
			},
			"longitude": {
				"name": "longitude",
				"type": "double"
			},
			"total_capacity": {
				"name": "total_capacity",
				"type": "long"
			}
		}
	}
}
We can briefly go over the semantics of the parameters in the JSON file :
playground: This is the name of the class and it must coincide with the name of the file (playground.json).cluster: We won't delve into it for the time being but this field specifies the MongoDB cluster name.ui: For now, we will be limiting ourselves to the generation of API end-points, but the rasp-platform is also capable of generatingJSONspecs to be fed to a front-end engine.fields: Here, we specify the attributes of the created class :name: The name of the attributetype: The data-type to be used - possible values includeString,double,longetc.index: Specifies whether the values should be uniquerequired: Specifies whether the field can benullduring creation.
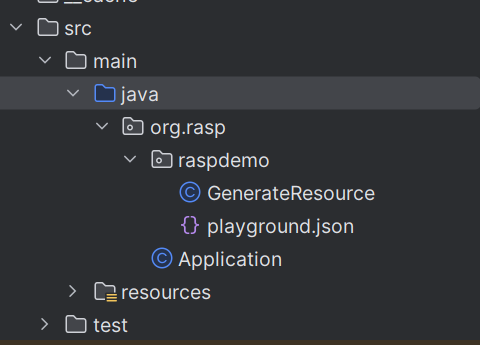
We add the JSON blueprint to the following location within our application :
src/main/java/{groupId}/{artifactId}/playground.json
Creating the necessary directories
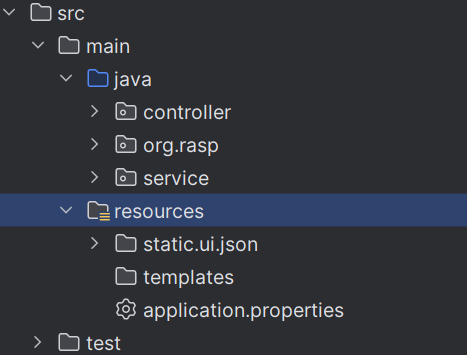
The following directories need to be created for code generation to work :
controllerandservice: Create directories named controller and service insrc/main/javastatic.ui.json: Create a directory with the file pathsrc/main/resources/static/ui/jsonto store UI elements created by the Generator.
The following image illustrates the creation of the above directories :
Adding the Generator class
We will add the following code in a Java file created at src/main/java/{groupId}/{artifactId}/GenerateResource.java :
package org.rasp.raspdemo;
import platform.defined.ResourceGenerator;
import platform.util.Util;

public class GenerateResource {
	public static void main(String []args) throws Exception {
		String web_app_director = "./src/main/resources/static/ui/json";
		String controller_dir = "./src/main/java/controller";
		String controller_package = "controller";
		if (args.length > 0) {
			web_app_director = args[0];
		}
		if (args.length > 1) {
			controller_dir = args[1];
		}
		if (args.length > 2) {
			controller_package = args[2];
		}
		ResourceGenerator generator = new ResourceGenerator("org.rasp.raspdemo","./src/main/java/org/rasp/raspdemo/");
		if (!Util.isEmpty(web_app_director)) {
			generator.setWeb_app_directory(web_app_director);
		}
		if (!Util.isEmpty(controller_dir)) {
			generator.setController_directory(controller_dir);
			generator.setController_directory_package(controller_package);
		}
		generator.generateCode("./src/main/java/org/rasp/raspdemo/", null);
	}
}
As you can see, certain paths need to be correctly specified for the Generator to work.
String web_app_director = "./src/main/resources/static/ui/json";
String controller_dir = "./src/main/java/controller";
String controller_package = "controller";
The above file paths can remain the same since the controller and UI directories were just created.
ResourceGenerator generator = new ResourceGenerator("org.rasp.raspdemo","./src/main/java/org/rasp/raspdemo/");
Here, supply the correct groupId.artifactId and the path to the parent directory of the GenerateResource.java file.
generator.generateCode("./src/main/java/org/rasp/raspdemo/", null);
Here too, supply the path to the parent directory of the GenerateResource.java file.
Running GenerateResource.java
At this point, everything is in place for the code generation step to work. Run the GenerateResource.java file to generate the files shown the image below :
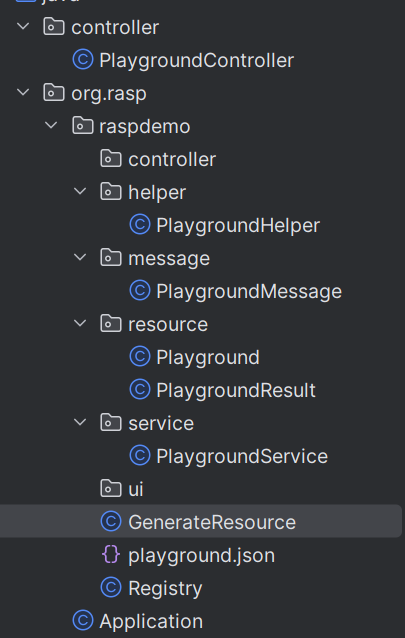
You will notice that Controllers, Services, Helpers, Resources and Messages are generated specific to the class described in the blueprint.